En un mundo perfecto, se debería poder poner la tinta en la impresora, ejecutar un trabajo y lograr la consistencia del color. Desgraciadamente, cada año las operaciones de impresión flexográfica y de huecograbado desperdician tinta, sustrato y tiempo de impresión tratando de conseguir el color correcto.
Aunque los avances tecnológicos han facilitado la precisión del color, las variables que afectan al color siguen existiendo. En esta serie de tres partes compartiremos más de dos docenas de razones por las que el color puede ser incorrecto en la impresora. El tema de hoy se centra en los problemas que pueden afectar a su instrumento de medición del color y a los sustratos.
1 – Elección del instrumento equivocado para el trabajo
Los espectrofotómetros 0°:45° como nuestro eXact son muy populares para aplicaciones de impresión y embalaje. Pero si está midiendo materiales reflectantes como globos de poliéster o láminas, o imprimiendo con tintas metálicas, debería utilizar un espectrofotómetro de geometría esférica como el Ci64.
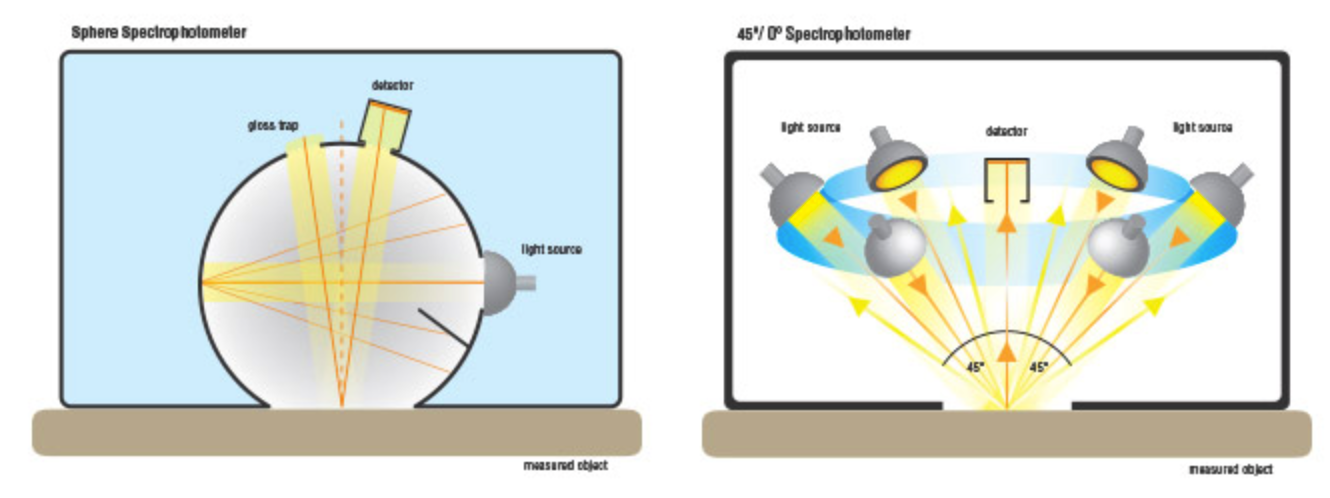
Las superficies reflectantes suponen un reto porque el efecto del brillo puede cambiar el aspecto del color de la muestra. Un espectrofotómetro de 0°/45° excluye el brillo para imitar la forma en que un observador humano ve la muestra. Por lo tanto, una medición en una lámina con un 0°:45° puede dar una lectura que no coincida con la forma en que la ve el ojo. El uso de un instrumento de esfera como un Ci64 puede incluir o excluir el brillo en diferentes aplicaciones para que coincida con lo que verá el ojo humano. Consulte nuestro blog Formas eficaces de medir superficies reflectantes para obtener más información.
2 – Utilizar un espectro descalibrado o que funciona mal
Un instrumento mal calibrado, especialmente uno que se haya caído, puede dar lugar a malas lecturas de color en la impresora. Si su instrumento no está leyendo correctamente y no está comprobando la calibración, técnicos de tinta podrían estar entonando colores que no deberían sólo para que el software diga que es correcto.
Este problema común es fácil de solucionar con un mantenimiento adecuado del dispositivo. Calibre regularmente, al menos antes de cada cambio de operación. Si su instrumento falla en la calibración o sus mediciones están muy alejadas, probablemente deba ser revisado. En nuestro blog sobre el cuidado de su espectrofotómetro se explican las opciones de servicio y certificación.
3 – Elegir los ajustes de iluminación incorrectos
Asegúrese de leer y evaluar su muestra utilizando los mismos ajustes de iluminante y observador que su estándar. La mayoría de las instalaciones de impresión comprueban los colores bajo una luz solar de mediodía D65/10° o una luz solar de horizonte D50/2°, pero a veces clientes especifican sus tolerancias únicas con antelación. Asegúrese de comprobarlo antes de empezar un trabajo.
4 – Olvidar cambiar el cálculo de Delta E
Delta E CMC ha sido la opción más popular desde que se desarrolló en 1988, pero Delta E 2000 ha ido ganando adeptos entre algunos de los mayores compradores de impresoras. Este cálculo de tolerancia actualizado es más tolerante cuando se trata de leer muestras de color. Consulte nuestro blog sobre tolerancias para obtener más información.
Algunos flujos de trabajo requieren que se cambie el cálculo de Delta E para diferentes clientes. En el calor de una puesta a punto, es fácil olvidarlo.
5 – Material de soporte deficiente
El material de soporte que coloca debajo de su muestra de impresión es muy importante. Muchas muestras no son completamente opacas, lo que permite que el instrumento recoja datos de color del fondo y distorsione los resultados de la medición. El uso de un soporte garantiza que el instrumento sólo lee los datos de color que usted desea capturar.
Una mesa de acero inoxidable o de madera no es una buena opción de respaldo. Para obtener lecturas consistentes, utilice siempre el mismo soporte blanco o negro.
La mejor opción es comprar materiales de soporte que cumplan con la norma ISO. Si decide elegir sus propios materiales de soporte, asegúrese de que son todos del mismo lote y que son consistentes en toda el área de medición. Recuerde que, si no cumplen la norma ISO, debe utilizar el mismo material desde la preimpresión hasta la impresión.
6 – Introducir manualmente los valores L*a*b*
Esto es algo que vemos a menudo. Un cliente envía a una impresora los valores L*a*b* para que los iguale, pero no incluye el conjunto completo de datos de reflectancia que se registraron cuando se midió el color. Aunque la persona impresora introduzca manualmente los valores L*a*b* como estándar de color, el color final podría no ser correcto.
Lo mejor es leer su estándar en el software con un dispositivo de medición de color, y luego exportarlo como un archivo .mif o .cxf. Estos archivos pueden ser fácilmente enviados por correo electrónico a y desde los clientes para asegurar que todo el mundo está trabajando desde el mismo estándar de color que incluye los datos de reflectancia.
7 – Utilizar el filtro equivocado (M0, M1, M2, M3)
Para obtener lecturas consistentes en papeles con abrillantadores ópticos y también lograr una concordancia en la cabina de visualización, la mayoría de las especificaciones de impresión utilizan ahora M1. Muchas impresoras utilizan un modo de medición diferente. Esto puede provocar un desajuste en el flujo de trabajo en función del papel utilizado y de la especificación u objetivo suministrado. Independientemente de si su operación ha hecho o no el cambio, es muy importante entender que algunos estándares pueden haber sido introducidos usando uno u otro. Tenga en cuenta estos ajustes M en coordinación con su operación. Cuando haga el cambio, es posible que tenga que volver a introducir muchas de sus normas.
8 – Diferentes procedimientos operativos
Si sólo una persona operaria sigue estos pasos, su color no va a ser consistente. Es necesario documentar todo y comunicarlo a todos los implicados en el flujo de trabajo. Los procedimientos operativos estándar (PNT) proporcionan una hoja de ruta, ayudan a resolver problemas y facilitan la formación de nuevas personas empleadas. Cuando los procedimientos normalizados de trabajo se desarrollan e implementan adecuadamente, también garantizan que todo el mundo utilice el espectrofotómetro de la misma manera, independientemente del turno o de la ubicación.
A continuación
Consulte las partes segunda y tercera de nuestra serie "Por qué su color puede ser incorrecto en la prensa", que trata de los problemas con las normas y la tinta y los factores ambientales.
