If you use eXact with BestMatch™, the answer might be yes. BestMatch helps you determine if you can achieve a closer match to a specified color by adjusting ink on press.
Formulating ink for a press run can be tricky because there are many things that go into it. The vehicle, colorants, and solvents are just a few of the things that impact ink quality, and whether it comes from your ink supplier or you mix it yourself, ink can vary in thickness or concentration. With BestMatch, you can confirm that the ink you put on press will meet your customer’s color tolerance requirements.
eXact’s BestMatch function also helps press operators keep ink color on target during make-ready and print runs. There are many factors that can affect print quality from one section of the press to the next. Sometimes the ink from one section can even contaminate the next color. If you control the press by density alone, you won’t see these shifts in color. And visual evaluation may not alert you to a problem until the color is considerably out of tolerance.
BestMatch is a predictive color tool that looks at concentration and ink thickness to see if you can get to the right color. Whether you’re trying to determine if you can hit a color using your press inks or need a PANTONE® Spot Color, or wondering if you can achieve a client’s spot color without cleaning the ink fountain and reformulating, BestMatch makes it possible to make go/no-go decisions on the fly. If getting to the right color is not possible, you’ll quickly know you need to go back and reformulate.
Today we’ll show you how to optimize your ink formulation, make-ready, and print workflow using the BestMatch feature available on the X-Rite eXact Standard and Advanced instruments.
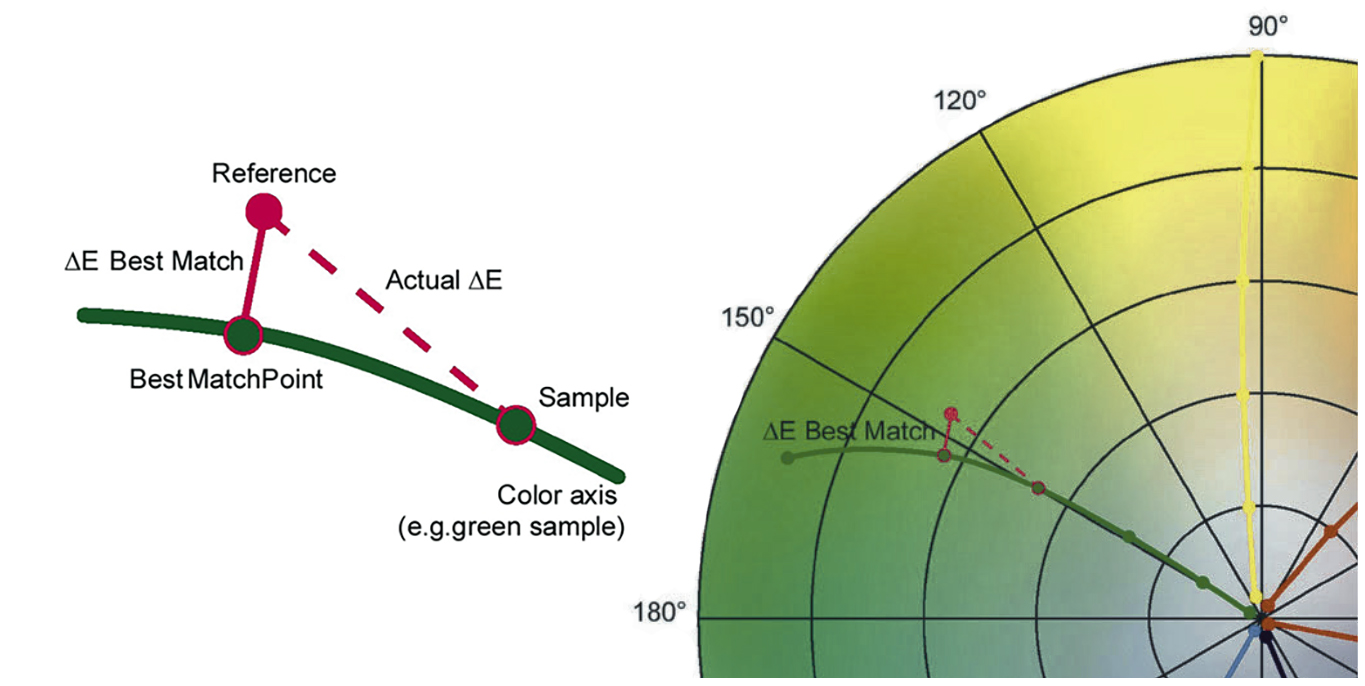
This is the color axis for a green sample. The BestMatch point shows the best possible green that can be achieved by adjusting the ink thickness or concentration, so you can quickly determine if rework is necessary.
How to use BestMatch on the X-Rite eXact
BestMatch helps in the very early stages of production by monitoring not only the density but also the color of the ink, so you can correct any problems before you print too much of the wrong color. It will tell you how to adjust the ink thickness (offset printing) or concentration (flexo and gravure) to achieve an optimum color match, plus predict the results you can expect to achieve after you make the adjustments. That way you will know whether it’s possible to achieve a match without rework. Since the eXact is integrated with multiple Pantone libraries, you can even use it to verify PANTONE Spot Colors.
Here’s how it works.
- Measure the paper white.
- Measure the color you need to achieve – the target.
- Highlight the “Sample” line on the display, and measure the color you have printed.
Everything you need to know will appear on the device’s color display, including density information for both the target and the sample. You will also see suggestions for adjusting the ink thickness or concentration to achieve an optimum color match, plus the predicted results after the adjustment is made.
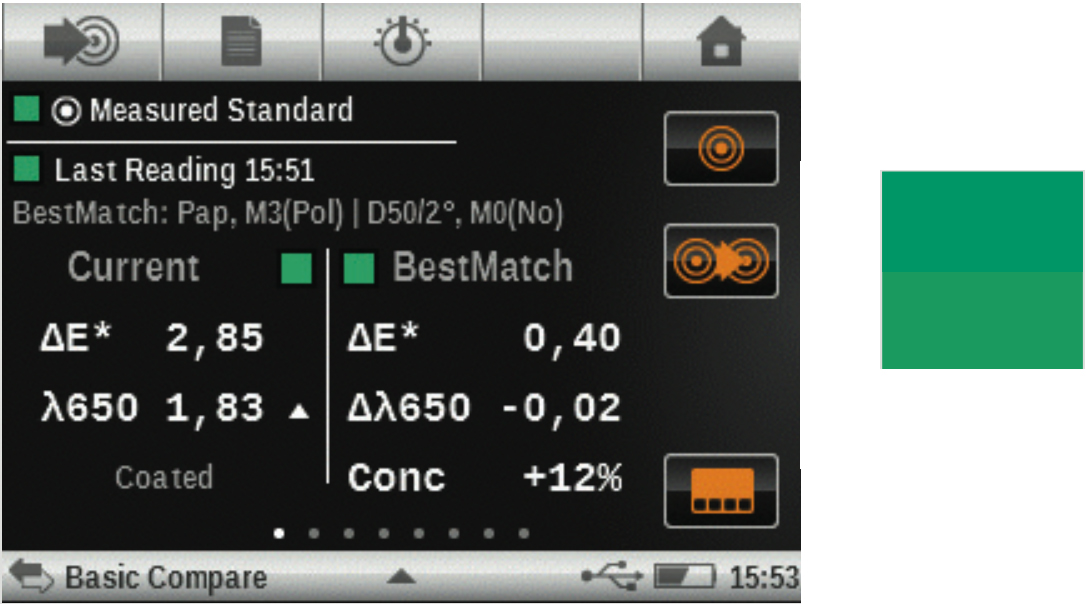
For example, here are the results of a green measured target and sample.
Here are the results of a measured target and sample.
On the left are the current results. This sample has a density of 1.83 at 650 nm center wavelength, and the ∆E between the target and sample is 2.85. Assuming the maximum acceptable tolerance for this print run is ∆E 1.5, it does not pass.
On the right side is the BestMatch. The first value, ∆E of 0.40, represents the estimated color variance from the target after the suggested adjustment is made. The next value, D –0.02, is the suggested negative or positive density adjustment required to hit the BestMatch. This value is useful for offset printers who need to adjust ink by thickness. The last value, +12%, is the concentration adjustment value for gravure or flexo printers.
This example is a success story. By following the recommendation to adjust the ink thickness by D –0.02, or concentration by +12%, you can achieve a ∆E of 0.40… well within tolerance. BestMatch saves this job.
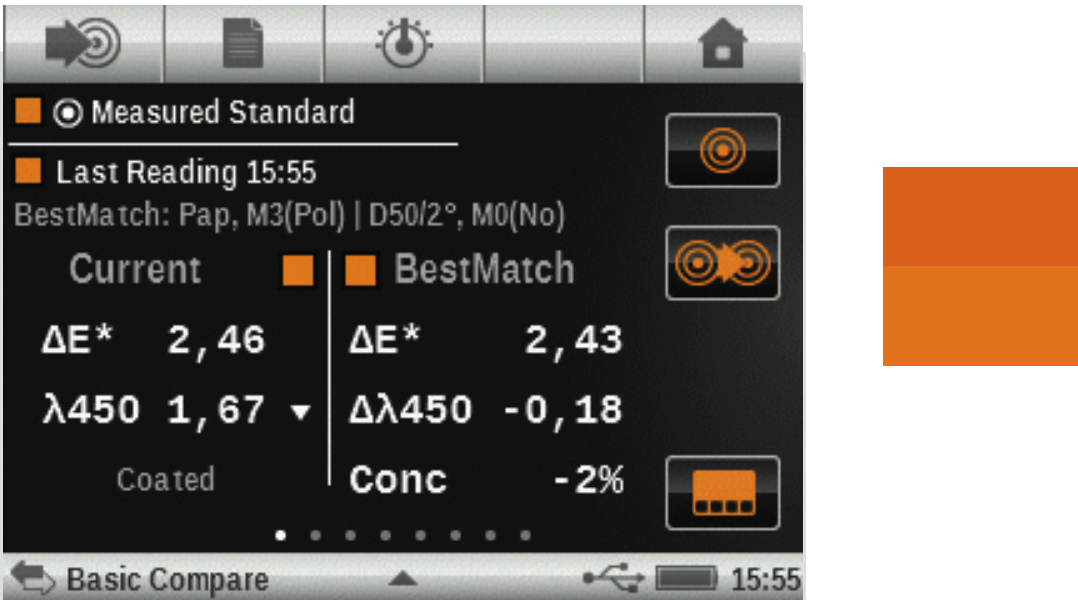
Here’s another, again assuming the maximum acceptable tolerance for the print run is ∆E 1.5. This sample has a density of 1.67 at 450 nm center wavelength, and the actual ∆E between target and sample is 2.46. Based on the sample density, the ink thickness/concentration should be adjusted by D -0.18 / -2% to achieve the BestMatch. However, it will only be possible to achieve a ∆E of 2.43, which is not within acceptable tolerance. The ink must be reformulated.
If BestMatch sounds like a good fit for your ink workflow, check out our product website and the free eXact tutorial to learn more.
